Bring a 3d object to life in a web browser with Tree.js.
Posted by Rishi Raj Gujadhur 1/27/2016
Table of content
Prerequisites
A. Introduction
B. Implementation
C. Setting up references
D. Drawing a cube
E. Setting up the camera
F. Animating a cube
G. Next step
A. Introduction
B. Implementation
C. Setting up references
D. Drawing a cube
E. Setting up the camera
F. Animating a cube
G. Next step
Prerequisites
- A fine knowledge of basic javaScript and html programming. You can learn basic html programming using the following link:
- Microsoft Visual Studio Ultimate or Express for Web.
A. Introduction
Three.js is used to develop and display animated 3D graphics on websites. You can find some examples of websites using three.js at: http://threejs.org/
B. Implementation
1. Certain features of three.js can only be used on server side. We will be using our localhost as a server for three.js. Open Visual Studio Ultimate or Express for web,
2. Create a new project
3.
- Select C#, ASP.NET Web Application.
- Name the application MyWebsite.
- Click OK

4.
- Check the MVC checkbox
- Click OK.

6. Download three.js-master using the following link: https://github.com/mrdoob/three.js/archive/master.zip
7. Extract the three.js-master folder
8. Drag and drop the three.js-master folder in your solution explorer.
9. Select: three.js-master>examples>index.html

10. Right click the index.html file
11. Click View in Browser, Shortcut: Ctrl + Shift + W
Result:

C. Setting Up References
1. Create a new html file
2. Right click on your solution explorer
3. Click Add New>HTML Page>OK
4. Select three.js.master>build>three.js
4. Drag and drop three.js to the headsection of your html page
5. Create a new javascript file and name it Main.js
6. Drag drop the Main.js file into the body section of your html file.
D. Drawing a Cube
1. In the javascript file, type:
store the window's width and height in variables for later use.
var width = window.innerWidth;

var height = window.innerHeight;
Defining the WebGL renderer to display your beautifully crafted sceanes
WebGL renderer: http://threejs.org/docs/#Reference/Renderers/WebGLRenderer
WebGL renderer: http://threejs.org/docs/#Reference/Renderers/WebGLRenderer
var renderer = new THREE.WebGLRenderer({ antialias: true });antialias: true ----> Here, we set the antialias to true, because we want the edges of objects to be smooth, not jagged.renderer.setSize(width, height); ----> seting the renderer size to the size of the window where animation will happen.renderer.setSize(width, height);document.body.appendChild(renderer.domElement); ----> add the renderer's canvas element to the document's body elementCanvas = The HTML <canvas> element is used to draw graphics, on the fly, via scripting (usually JavaScript). www.w3schools.com/html/html5_canvas.asp
document.body.appendChild(renderer.domElement);var scene = new THREE.Scene; ----> Define scene:var scene = new THREE.Scene;Drawing a cube to the canvas
In Three.js the objects that are being drawn on the screen are called meshes.
In Three.js the objects that are being drawn on the screen are called meshes.
var cubeGeometry = new THREE.CubeGeometry(100, 100, 100);100,100,100 ----> The arguments are defining a size of the cube: the width, height and depth.THREE.MeshLambertMaterial ----> used for lightingvar cubeMaterial = new THREE.MeshLambertMaterial({ color: 0x1ec876 });
color: 0x1ec876 ---> hexadecimal number color, try the following link to find the hexadecimal number of specific a color, http://www.color-hex.com/cubeGeometry, cubeMaterial ----> Each mesh has its own geometry and materialcreate a mesh using the geometry and material created earlier.
var cube = new THREE.Mesh(cubeGeometry, cubeMaterial);cube.rotation.y ----> rotate the cube by 45 degrees on the Y axis, to make it look better.cube.rotation.y = Math.PI * 45 / 180;Math.PI * 45 / 180; ----> change degrees to radiansscene.add(cube); scene.add(cube); ----> cube is added to the scene.2. Save the main.js file and execute your html document in the Web Browser.
Result:

You will see a black screen (your blank canvas) because the scene is not rendered yet.
E. Setting up the camera
45 ----> field of viewwidth / height ----> camera's ratio (render's width / render's height = camera's ratio)0.1, 10000 ----> how close and how far we want our camera to be from the mesh (cube)var camera = new THREE.PerspectiveCamera(45, width / height, 0.1, 10000);the objects created in Three.js have their position set in the middle of the scene (x: 0, y: 0, z: 0) by default thus we need to more our camera away from the mesh
camera.position.y = 160;

camera.position.z = 400;

camera.lookAt(cube.position);
To render something, first we need to add the camera to the scene, so the renderer knows from which point of view it should render stuff.
scene.add(camera);var pointLight = new THREE.PointLight(0xffffff);THREE.PointLight ----> add light to the scenepointLight.position.set(0, 300, 200);pointLight.position.set(0, 300, 200); ----> setting light positionscene.add(pointLight);scene.add(pointLight); ----> Add the light to the scene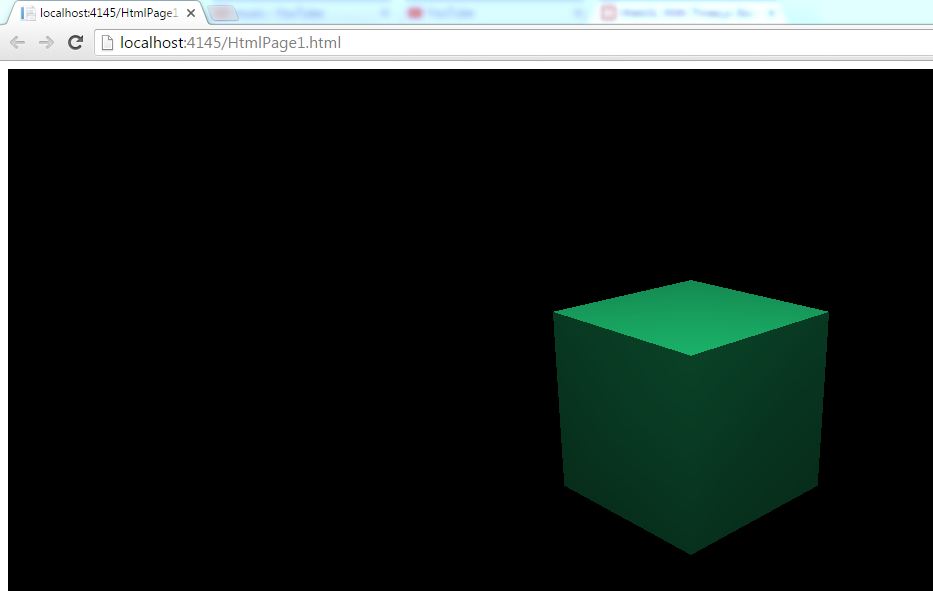
F. Animating a cube
var clock = new THREE.Clock;var clock = new THREE.Clock; ----> achieving smooth animation of the object.function render() {function render() {...} ----> Create a custom render functionrequestAnimationFrame(render); continuesly rotate the cube based on the clock time
if you want to rotate the cube from the x axis then simply replace the y with an rotation.y with rotation.y
if you want to rotate the cube from the x axis then simply replace the y with an rotation.y with rotation.y
cube.rotation.y -= clock.getDelta();renderer.render(scene, camera);renderer.render(scene, camera); ----> render the camera:}render(); ----> execute the custom render functionrender();G. Next Step
Feel free to apply all the concepts that you learnt in this tutorial using Visual Studio Express for Web or Ultimate.