Work in progress.
Posted by Rishi Raj Gujadhur 6/26/2016
1. Create a default Asp.net web api application using the template provided in visual studio.
2. Create a class named "Employee" in the model folder.
2.1 Add the following properties to the class Employee
2.2 Build the project.
3. Create a new controller
3.1 Name it EmployeesController
3.2 Select Web API 2 Controller with actions, using Entity Framework
3.3 Select model class "Employee" (You previously created this class)
3.4 Create a new data context by clicking the + button
3.5 Click Add.
Access Entity Framework Migration for your project:
4. In the toolbar on visual studio ,Click Tools
4.1 Go to nuget package manager
4.2 Click on package manager console
4.3 In the console type: Enable-Migrations
4.4 Press enter on your keyboard
4.5 You might get the following message:
As per the above instructions and your previously created Data Context created on step 3.4, type or copy and paste: Enable-Migrations -ContextTypeName WebApi.Models.WebApiContext
4.6 Press Enter
5 Add Additional migration by typing: Add-Migration InitialCreate
By now, you should have these tabs opened automatically on Visual Studio.

5.1 Click on the Configuration.cs Tab
5.2 Go to the Seed method
5.3 Type:
We use the DbSet<T>.AddOrUpdate() helper extension method create/update seed data
5.4 The Employee keyword would be underlined red as shown below:
5.5 Left click the Employee keyword
5.6 Press Ctrl and . together on your keyboard
5.7 Click on using YourApplicationName.Models or simply add the statement using YourApplicationName.Models; next to the other using statements on top.
5.8. On the packgage manager console type: Update-Database
This would ensure that the database is populated with the new employees that we created previously.
2. Create a class named "Employee" in the model folder.
2.1 Add the following properties to the class Employee
public class Employee
    {
        public int Id { get; set; }
        public string Name { get; set; }
        public string Email { get; set; }
        public float Salary { get; set; }
    }
2.2 Build the project.
3. Create a new controller
3.1 Name it EmployeesController
3.2 Select Web API 2 Controller with actions, using Entity Framework
3.3 Select model class "Employee" (You previously created this class)
3.4 Create a new data context by clicking the + button
3.5 Click Add.
Access Entity Framework Migration for your project:
4. In the toolbar on visual studio ,Click Tools
4.1 Go to nuget package manager
4.2 Click on package manager console
4.3 In the console type: Enable-Migrations
4.4 Press enter on your keyboard
4.5 You might get the following message:
More than one context type was found in the assembly 'WebApi'.
To enable migrations for 'WebApi.Models.ApplicationDbContext', use Enable-Migrations -ContextTypeName WebApi.Models.ApplicationDbContext.
To enable migrations for 'WebApi.Models.WebApiContext', use Enable-Migrations -ContextTypeName WebApi.Models.WebApiContext.
To enable migrations for 'WebApi.Models.ApplicationDbContext', use Enable-Migrations -ContextTypeName WebApi.Models.ApplicationDbContext.
To enable migrations for 'WebApi.Models.WebApiContext', use Enable-Migrations -ContextTypeName WebApi.Models.WebApiContext.
As per the above instructions and your previously created Data Context created on step 3.4, type or copy and paste: Enable-Migrations -ContextTypeName WebApi.Models.WebApiContext
4.6 Press Enter
5 Add Additional migration by typing: Add-Migration InitialCreate
By now, you should have these tabs opened automatically on Visual Studio.
5.1 Click on the Configuration.cs Tab
5.2 Go to the Seed method
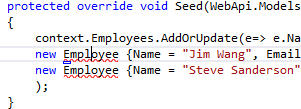
5.3 Type:
 context.Employees.AddOrUpdate(
            e=> e.Name,
            new Employee {Name = "Jim Wang", Email = "jim.wang@microsoft.com", Salary =1 },
            new Employee {Name = "Steve Sanderson", Email = "stevesanderson@microsoft.com", Salary =1 }
            );
We use the DbSet<T>.AddOrUpdate() helper extension method create/update seed data
5.4 The Employee keyword would be underlined red as shown below:
5.5 Left click the Employee keyword
5.6 Press Ctrl and . together on your keyboard
5.7 Click on using YourApplicationName.Models or simply add the statement using YourApplicationName.Models; next to the other using statements on top.
5.8. On the packgage manager console type: Update-Database
This would ensure that the database is populated with the new employees that we created previously.